Content

Written by: Nuno Leiria, Founder & CEO @ Nilo | Last updated: July 1, 2026

Key Takeaways

  • You can make your first Roblox shirt or pants with the official template, a free browser editor, and a small upload fee.

  • Learning how the UV map works helps your flat 2D design wrap cleanly around your 3D avatar.

  • You avoid common issues like visible template lines or seams by hiding the guide layer and extending colors past the zone edges.

  • AI tools can skip templates and UV maps by generating, previewing, and exporting skins straight from your text or sketch ideas.

  • Nilo stands out by letting you generate and export Roblox-ready skins in minutes, so you can focus on your ideas instead of file setup.

What You Need Before Making Roblox Clothing

Roblox clothing uses two transparent PNG image files, one for shirts and one for pants. Each file wraps around your avatar’s body using a UV map, which works like wrapping paper folding around a box. You are learning how to place your design on that flat image so it lands in the right spot on the 3D avatar.

You only need three things to start. First, you need a Roblox account so you can upload and wear your clothing. Second, you need at least 10 Robux, which Roblox uses as the upload fee for each clothing item. Third, you need a device that can open a browser tab so you can use free editors like Photopea or Pixlr. You do not need a design degree, Blender, or a paid Photoshop subscription.

Step-by-Step: Create Your First Roblox Shirt

Follow these five steps and you can have your first shirt on your avatar today.

Step 1 — Download the official template. Log into Roblox, go to the Create page, select “Shirts” under Classic Clothing, and download the shirt template PNG. The file shows where the front, back, sleeves, and collar sit on your avatar. This setup takes only a couple of minutes.

Step 2 — Open the template in a free 2D editor. Drag the template file into Photopea or Pixlr, which both run in your browser with no install. Create a new layer above the template so you do not erase the guide lines. Draw or paint your design inside the colored zones on this new layer.

Step 3 — Export as a 585×559 PNG. In Photopea, choose File, then Export As, then PNG. In Pixlr, choose File, then Save, then PNG. Keep the canvas size at 585×559 pixels. Roblox rejects files that use different dimensions.

Step 4 — Upload through the Roblox Avatar Shop. Go back to the Roblox Create page, click “Upload” next to Shirts, pick your PNG, and give it a name. Confirm the upload fee when Roblox asks you to continue.

Step 5 — Test on your avatar. Open your Avatar Editor, find the shirt under Clothing, and equip it. Look for white lines, stretched areas, or color shifts before you share the shirt with friends.

How Roblox’s Free Shirt Template Actually Works

The official Roblox template is a flat PNG that shows every surface of the avatar’s body unfolded. This unfolded layout is the UV map. Imagine cutting open a cardboard box and laying it flat on a table. Each panel on that flat shape becomes a different part of the box when you fold it back up. The template works the same way for your avatar’s chest, sleeves, and back.

When you open the template in Photopea or Pixlr, keep it on its own locked layer at the bottom of your layer list. Draw your design on a new layer above it so the guide never gets damaged. Before you export, hide or delete the template layer so only your design stays visible. If you forget this step, the gray guide lines appear on your shirt in-game.

Stay inside the colored zones when you draw. Anything you place in the transparent checkerboard areas outside those zones will not show up on your avatar.

Using Pixlr or Photopea for Roblox Clothing

Pixlr gives you a simple, free way to edit Roblox clothing in your browser. Here is a clear workflow you can follow.

Go to pixlr.com and choose “Pixlr E,” which is the advanced editor. Open your Roblox template through File, then Open Image. Create a drawing layer above the template with Layer, then New Layer. Use the Paint Bucket or Brush tools to add colors, logos, and details. When you finish, choose File, then Save, then Download, and pick PNG at 100% quality. The file keeps the correct 585×559 size as long as you never resize the canvas.

Photopea follows almost the same steps and adds Photoshop-style blending modes. These modes help you build smoother gradients and more detailed textures. Both tools are free and work without creating an account, so you can jump in quickly.

AI Roblox Clothing With Nilo’s Workbench

Some creators find the template and layer workflow slow or confusing. AI-native platforms such as Nilo reduce these problems by letting you describe what you want and see it appear on a 3D avatar.

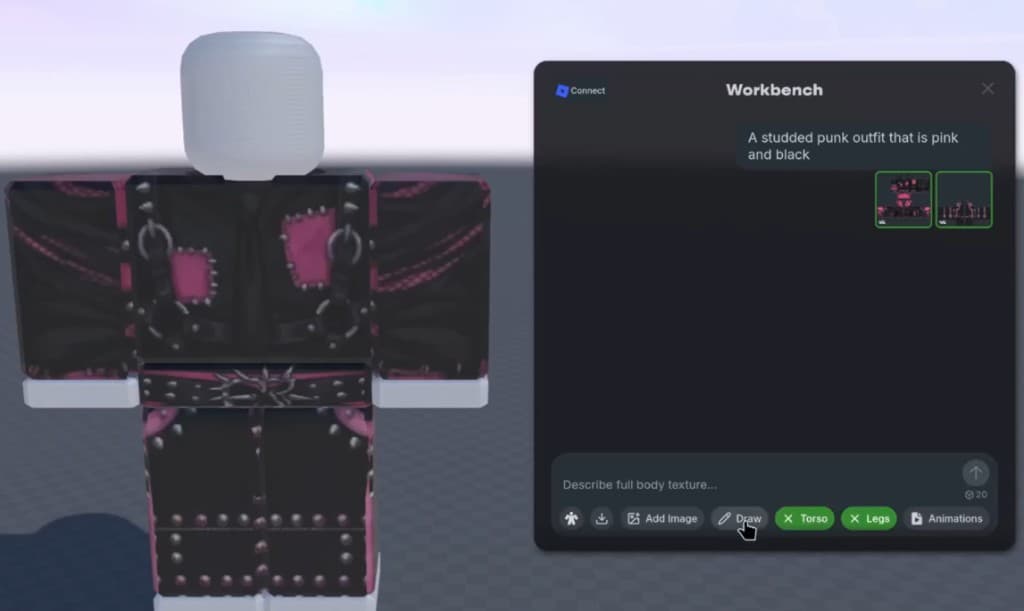
Nilo is a 3D creation platform that runs in your browser and supports custom Roblox skins. Open the site, type or sketch your clothing idea, and let the AI generate a skin from your prompt. For example, you can write “black hoodie with red flames” and then refine the result. The Workbench feature gives you AI texture tools and drawing brushes so you can tweak details, then preview the clothing on a 3D avatar in real time before export. When you like what you see, click Export, choose Roblox, and download a file ready for Roblox Studio.

Roblox rejects models that use more than 20,000 triangles, which can force you to reduce model complexity by hand. That manual process is called retopology and usually takes a lot of time. Nilo’s level of detail system adjusts the triangle count for you in real time, so your clothing stays under the limit without extra cleanup work.

Creators in Nilo’s February 2026 survey said they could replace hours of basic 3D modeling with a few seconds of AI generation. The platform is in open beta and currently free to join, so you can test this workflow without spending a bunch of money.

Try Nilo free, with no download or install, and start creating directly in your browser.

Comparing Nilo and BloxMake for Clothing Creation

If you are choosing between AI-driven tools and template editors, this comparison highlights where each approach saves or costs you time.

Feature

Nilo

BloxMake

Time to first shirt

Minutes, because AI generates and exports for you

Depends on how complex your design is

Real-time 3D preview

Yes, you see the avatar before export

Only a 2D editor view

Mobile browser support

Works on most device browsers

More limited support

Photoshop or template required

No, you start from text or sketch

Yes, you follow a template workflow

Nilo stands out because it combines AI clothing generation, instant 3D preview, and automatic triangle control in one place. Template-based editors like BloxMake give you full manual control over every pixel, which can feel better if you already enjoy 2D art tools. If you mainly want to see your idea on a 3D avatar quickly, Nilo can shorten that path.

Common Roblox Clothing Problems and Fixes

Template lines showing on the avatar. This problem appears when you export with the template layer still visible. Hide or delete the template layer before exporting so only your design layer ends up in the PNG.

Clothing not loading on mobile. Phones struggle with very large textures and heavy 3D models. Files that exceed Roblox’s 1024×1024 texture limit or meshes with too many triangles often fail to load. In Nilo, you can move the level of detail slider to lower the triangle count until the model passes Roblox’s performance checks.

Colors looking different after upload. Roblox compresses images during upload, which can shift bright or neon colors. Use slightly softer tones in your design to keep the final look closer to your original. You can also rely on Nilo’s preview feature, mentioned earlier, to see how colors will likely appear before you pay the upload fee.

Visible seams where body parts meet. Seams usually mean the edges of your design do not line up across the fold lines on the template. Zoom into those areas in your editor and push your colors a few pixels past each boundary. If you work in Nilo, the AI skin generation handles seam alignment for you.

Checklist: How To Know Your Clothing Works

This quick checklist helps you confirm that your first Roblox clothing item behaves correctly in-game.

  • Your clothing appears on your avatar within a few minutes of uploading.

  • No white lines or gray template marks show up at the seams.

  • The clothing loads and displays correctly on a phone when you equip it.

  • Friends can see the clothing when they join the same game as you.

  • Colors match your design without unexpected gray or washed-out patches.

If any of these checks fail, look back at the Common Challenges section for likely causes. When you use Nilo’s AI workflow, the preview feature mentioned earlier helps you catch seam and color issues before uploading, which reduces the chance of wasting Robux on fixes.

Choosing Your Roblox Clothing Workflow

You have two main paths as a beginner clothing creator. The 2D template route uses the official file, a free editor like Photopea or Pixlr, a 585×559 PNG export, and a small upload fee. This path gives you precise control over every pixel and works with tools you can open right now.

The AI route through Nilo removes template management and seam guessing. You describe your idea with text or a sketch, adjust it in a real-time 3D preview, and export a Roblox-ready file with one click. Both paths end with the same result, your design on your avatar and visible to your friends. The difference is how much time and manual setup you want to handle.

Join Nilo’s open beta to start building and playing for free directly in your browser.

Frequently Asked Questions

Do I need to pay anything to make Roblox clothing as a beginner?

Roblox charges a small fee in Robux when you upload each shirt or pair of pants. Designing the clothing itself can stay completely free. Photopea and Pixlr both run in your browser at no cost, and the official Roblox template is free to download. Nilo is also free to join during open beta and gives you a monthly amount of Nilo Bits for AI generation and export. Many core building tools in Nilo do not use Bits, so you can explore before spending anything.

What is a UV map and why does it matter for Roblox clothing?

A UV map controls how a flat 2D image wraps around a 3D shape. Picture the net of a cardboard box laid flat on a table. When you fold the box back up, each panel lands in a specific place. The Roblox clothing template works the same way for your avatar’s body. Each zone on the flat image maps to a body part, such as the chest, back, or sleeves.

If you draw in the wrong zone, your design appears in the wrong place on the avatar. A logo meant for the chest might slide onto the back. Learning which zone maps to which body part is the main skill in the 2D clothing workflow. Nilo’s AI handles UV mapping for you, so you can focus on the idea instead of the layout.

Why does my Roblox shirt show white lines or seams after uploading?

White lines at seams usually come from two issues. You might have exported with the template guide layer still visible, or your design might stop too early at the edges of each zone. Hide or delete the template layer before exporting your PNG to fix the first problem. Zoom into the boundary areas and push your colors a few pixels past the fold lines to fix the second.

If you use Nilo, the AI skin generation keeps seams aligned, and the preview feature lets you spot problems before you upload.

What is the difference between a Roblox shirt and a Roblox t-shirt?

In Roblox, a shirt is a Classic Clothing item that wraps around your avatar’s torso and arms using a template. A t-shirt is simpler. It is a square image that appears as a flat decal on the front of your avatar’s torso with no wrapping. T-shirts are quicker to make because you only upload a square PNG, but they look flatter and less fitted. If you want clothing that follows your avatar’s shape, use the shirt or pants template workflow from this guide.

Can I sell the clothing I make on Roblox?

Yes. After you upload a clothing item to Roblox, you own it and can list it for sale on the Roblox Marketplace. Roblox pays creators through its creator economy, which distributes over $1 billion each year and keeps growing. The same rule applies to items you create with Nilo. Any skins, models, or UGC items you generate and export belong to you, and you can publish and monetize them on Roblox or other platforms.